


Do you know how to make spaghetti alla chitarra? You just need 2 ingredients and the right frame: the ‘chitarra’.
In no time you will prepare some excellent spaghetti alla chitarra. They are delicious both with a simple tomato sauce and more elaborate sauces with fish or meat.
Spaghetti alla chitarra is a typical variety of pasta from Central and South Italy, with a square section about 2-3 mm. Usually, it is prepared with durum wheat flour and eggs but in some recipes, eggs are replaced with water.
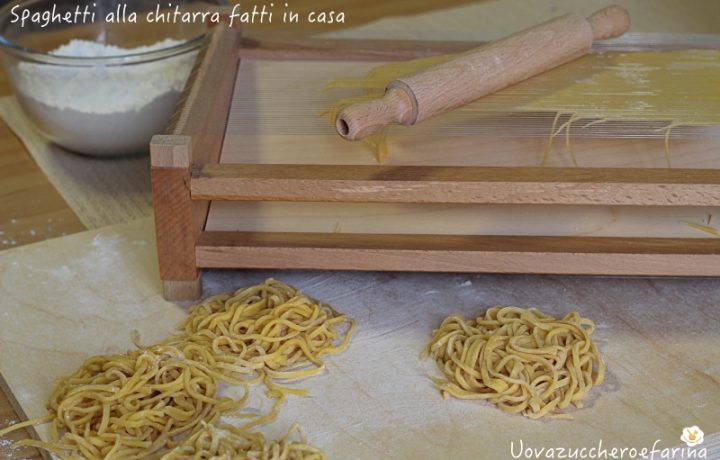
The essential tool is the frame called chitarra (guitar, because it looks like the musical instrument): a simple horizontal wooden frame with a series of parallel wires and a diagonal tray positioned at the base.
A recommendation: this variety of pasta tends to dry quickly, so if you don’t intend to cook it right away, put it on a pasta hanger, then store it in the refrigerator up to 3 days or in the freezer.
Here’s how to prepare the spaghetti alla chitarra step by step:
Here’s the essential chitarra frame. For full detail or to order it, see below.

35,00€ 24,00€
![]()

22,00€
![]()
Below you can find the recipe of Uovazuccheroefarina
Preparation time: 2 hours
Yield: makes 4-6 servings
Ingredients
- 3 eggs
- 300g plain flour
Instructions
- On your work surface, sift the flour and shape it into a fountain, add the eggs and knead by hand.
- When the dough starts to form crumbs, work it with energy until you get a smooth dough without lumps. Cover it with a bowl and leave it to rest for at least half an hour.
- Cut 1/3 of the dough, flatten it a bit with your fingers and use the rolling pin to form an even sheet of pasta.
- Flour the chitarra, put a sheet of pasta on it and begin rolling: as you apply pressure the strings begin to cut the pasta.
- As the spaghetti falls into the tray, form some pasta nests or transfer the spaghetti on the pasta hanger.
- Proceed with the rest of the dough. If the wires loosen a little, tighten the screws placed on both sides.

 Contattaci